|
We now need to setup our squeeze
page for this step. The squeeze page is
also known as the landing page. The idea behind the squeeze page is
that we
give people two main options. The first option is to give up their
email
address in exchange for your lead magnet, and the second option is to
leave the
page.
To make sure you convert the
best you want to keep your squeeze page
looking as simple as possible. The reason they call it a squeeze page
is
because we want to “squeeze” information out of those that
visited the page!
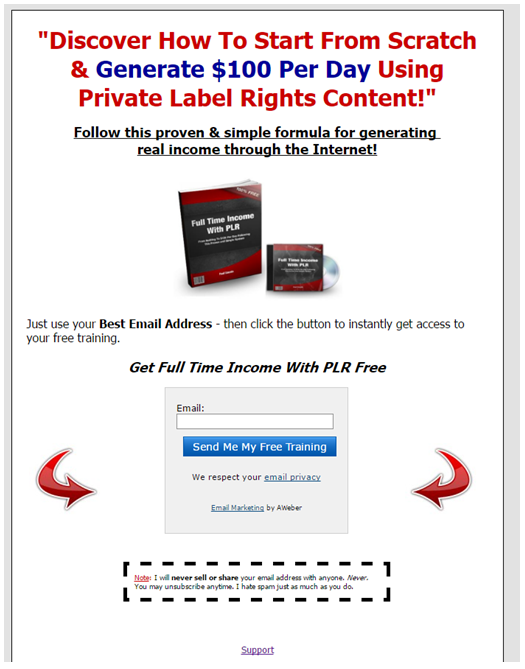
As you can see from my example
squeeze page, you want to keep it simple.
I am giving you the template for my top converting squeeze page. This
page was
not made with any fancy page builder. In fact, it was all made using a
free
HTML editor called Kompozer!
This page has consistently been
my top converting squeeze page seeing
conversion rates above 50%! With your squeeze page you want to go for
conversions between 35% and 50%, but if you can find a winner above 50%
that is
all the better! So that is why I am including my top converting
template for
you.
The main
elements you want on
a squeeze page is an attention-grabbing headline. Your headline should
pull
people in with benefits of what they will receive from your lead
magnet.
For example,
if you are doing
a lead magnet on “The Top 8 Tax Savings Every Small Business
Owner Needs To
Know About”, then you would have a headline that could sound like
this:
“Discover
The Top 8 Tax
Savings Every Small Business Needs To Know!”
This would
surely draw them in
because it peaks their curiosity. You can apply this for any lead
magnet in any
niche market as well! That’s the beauty of it!
So focus on a
good headline,
and a simple sub-headline. In my sub-headline, which appears below the
headline
I say: “Follow this proven & simple formula for generating
real income
through the Internet.”
For the tax
example, you could
say: “Follow this proven & simple formula for saving massive
amounts on
your taxes!”
To edit the
squeeze page
template that I am including with this ebook you can use a free
software called
Kompozer that you can download at www.kompozer.net.
Once you
download the template
you simply replace the text wording with your words and replace the
image with
your images. If you want images you can use go to www.pixabay.com
as they have 920,000 free royalty
free images you can use. If you want an ecover like I have you can hire
someone
cheap on www.fiverr.com or use a software
called PixelStudioFx for all your
ecover needs.
For inserting
your web form
just follow the instructions found on the help section of your
autoresponder of
choice. These links were found in Day #2. They provide helpful
tutorials for
setting up your web form and integrating it onto your page.
If you really
get stuck here
don’t be afraid to go to www.fiverr.com
and type in “autoresponder” to find someone that can assist
you for a very
small price. Sometimes paying $5 to $25 to get something done right is
much
better than spending hour upon hours of frustration!
Alternatively
if you want you
can create your landing pages and squeeze pages using pre-tested pages
found at www.leadpages.net, www.clickfunnels.com,
or www.optimizepress.com which uses
Wordpress.
Setting up
the squeeze page is
just one of the main things we wanted to accomplish for today!
The next most
important task
is to provide a link to the squeeze page on all the pages that you
control
online. This includes your blog, website, email signature, YouTube
Channel,
Twitter Profile, Instagram Profile, Pinterest Profile, LinkedIn
Profile,
Facebook Profile, Facebook Page, WeChat profile, resource box for
articles you
may have written and published online already!
The point is
you want to get
your squeeze page link out all over the web so people keep coming back
to this
page. You can honestly run an entire six figure per year online
business with
just a simple squeeze page like we setup in this step here in day #4.
So take
this serious and get this page out there!
Over the next
25 or so days
that focus is to drive traffic that ultimately leads back to this optin
form.
You want to get as many subscribers as you possibly can! Spend a little
extra
time today making sure all your bases are covered, and that this
squeeze page
can be found all over your social media profiles! It will greatly help
you with
the steps to come!
Day #4 Assignment: Setup your squeeze
page and autoresponder web form for today’s assignment. Then
place the link to
your squeeze page and opt-in page all over the web on the social media
channels
and pages that you own already!
|